It’s time for another oven project update. In my mind, I
have mini-milestones. After I get to one, it’s time for an update. Well, we
just hit one. The dome is closed.
When I wrote the last update, the oven walls were done and I
was starting go up with the bricks. I
was basically building a big horseshoe and delaying the entry arch for as long
as possible. The reason for that is once the arch was built, my fat butt couldn’t
get through to make the joints look pretty and clean the brick of the mortar
mess I was making – while I have gotten better, I’m still not a mason.
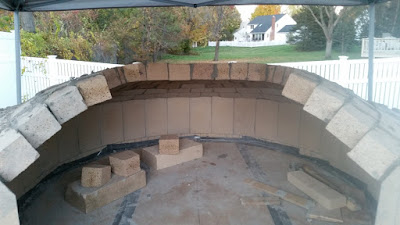
So the horseshoe, that looks like a mini coliseum to me, got
bigger row by row.
Rustic looking, but surprisingly strong. That HeatStop 50 mortar is good stuff. I had been using a bunch of different supports to hold bricks in place – small pieces of wood, bricks, shims, pipe clamps – basically anything that could get me the 20 minutes of time for the mortar to kind of set. After awhile, there was no avoiding the arch.
General Tools makes something called the Angle-izer and for
a long time on their website, they offered a free download to help you plan
arches and bull’s-eye layouts and a few other things. They don’t offer it any
more. Luckily, I have been planning this build off and on for over 6 years, so
I had already downloaded it. You give the program the span, height of the arch,
some brick dimensions and the size of the mortar joint. With that information,
the program can tell you how many tapered bricks you need and the
dimensions. It gets an amateur like me
in the ball park.
So with my brick dimensions and an absurdly large wet saw
I have named Ron, I cut the arch. It actually worked.
I laid it out dry, cut the curve into a 2x4 to hold it up and then
mortared it all together. (This is the part of the build where we gloss over me cracking one of the arch joints while tightening a clamp, then took half the arch
apart and spent two hours putting it back together – I’ll deny it if the
subject ever comes up again).
Then rows 6, 7 and finally the odd shaped plug were set. The odd shape plug, which ideally would have been closer to a circle, is said to make the oven a work of art since it is a one of a kind piece and not a cookie cutter perfect circle. I like the sound of that because there is no mistaking that plug for a circle. I had cut a roundish piece of plywood to hold the last rows in place while they set...and I'm kind of proud of myself that I remembered to make the piece smaller than the door opening.
Once everything was set, there was still a little bit of joint cleaning inside the dome. I believe the technical terms are pointing and tucking. As mentioned earlier, I don’t fit in the oven. I tried. I twisted and turned and tried to reach spots in weird contorted ways. It wasn’t working.
I found the solution: child labor.
I love that picture. She's quite proud of it too and has sent it to several of her friends. Lying on mats, my 10 year old slid right in there and did a pretty good job at hitting the spots I wanted to hit. All that was left was to add a little more mass to the dome. The walls are 3 inches thick. The way I used the bricks, the dome is only 2.5 inches thick. I mixed some more of the same mix I used to pour the walls and packed it onto the dome.
Covering up all that brickwork was bittersweet. Progress, but it was a good amount of work and looked kind of cool. The insulation would have covered it anyway. This layer will take about a week to cure. In that time I hope to build the entry arches and chimney. And at some point I should probably start getting ready for Thanksgiving.


